Dal Chicken (Curried Chicken with Lentils)

I’m done with summer, even though it seems reluctant to let go of me.

I remember the time when I was younger and actually looked forward to summers. But back then summer meant time away from school, and going off on holiday with the family. Summers were also not as beastly hot as they are now, the sun a lot gentler on the skin and when SPF 15 and a sun-hat did the job, though my mum seems to recall that I regularly suffered from sun-strokes every summer like clockwork.

We have of course no one to blame but ourselves as we’ve learnt. The excesses of generations before, taken forward by ours, caused enough havoc before we came to our senses and tried to stem the damage we had done to the environment. Global warming, depletion of the ozone layer, the earth’s coat for many seasons, and CFC’s became words we grew acquainted with… but is it all too late? Sudden changes in temperatures around the world and what can only be called freaky weather patterns started emerging worldwide. Unexplained snowfall in areas that had never seen snow and sharp peaks in temperature around the world have become commonplace. The polar ice sheets are melting at an alarmingly rapid pace and we realise that we are hurtling down the road to extinction with brakes that no longer work like they used to and worse still, with a gaping hole in our gas tank.

In short this summer’s been beastly! A good thing for beer companies and the government if you ask me, both of who make a pretty packet out of our misery. One could always try drinking fresh fruit juices, but with inflation at its peak, and at a dollar for one decent juicy orange, it’s not within everyone’s reach. So water is at the end of the day your best bet, even if you have to buy the bottled options, the only down side is that it doesn’t come in flavours 😉

Summer also means eating light, especially during the day, but then there are those occasions when the body and mouth craves something more substantial. So one night I thought I’d rustle up one of my favourite meals…

Dal Chicken or Curried Chicken with Lentils.

Dal Chicken garnished with spicy potato straws and peanuts

This dish can be made with red meat or with chicken and has three different dals (lentils) as its base. I’ve used split and hulled red lentil (masur dal), split and hulled moong dal and split and hulled black gram (urad dal… which is cream in colour once its black outer coat is removed).

Here are the ingredients –

500gms chicken on the bone (cut into pieces)

3/4″ piece of ginger (minced)

4 – 5 cloves garlic (minced)

juice of 1 lime (+ extra to finish the dish)

(marinade the chicken in the ginger, garlic, lime juice mix and keep refrigerated overnight)

1/4 cup masur dal

1/4 cup yellow moong dal

1/4 cup urad dal

(wash and soak the above dals overnight – then parboil and reserve)

1 medium onion (sliced fine)

1/2 teaspoon freshly milled black pepper

1/2 teaspoon sambar (sambhar) powder ( you should get this in stores that supply Indian spice powders)

1/4 teaspoon turmeric powder

1/2 teaspoon kashmiri chilli powder

1 teaspoon cumin powder

1 teaspoon coriander powder

1/2 teaspoon garam masala (1/4 teaspoon while frying the spices and a 1/4 teaspoon at the end to finish off the dish)

3 tablespoons sunflower oil

small sprig of curry leaves

2 green chillies (deseed if you don’t want it too hot)

2 small dried or fresh bay leaves

1 cup chopped tomatoes

1 teaspoon + salt

2 teaspoons chopped fresh coriander

1 heaped teaspoon ghee (clarified butter)

pinch of dry mango powder (aamchur powder)

This dish involves quite a few steps but it’s well worth the effort, and makes for a soul satisfying meal.

Start by frying the sliced onions in the oil till they start to caramelise. Add in the curry leaves and the chopped tomatoes, with a pinch of salt and fry on high for 30 seconds, then reduce to low and simmer covered for 10 minutes till the tomatoes completely break down. Add the bay leaves and the powdered spices and fry them on low (lowest flame) for 2 – 3 minutes, stirring occasionally.

Now add the chicken, one piece at a time, and turn up the flame a notch so that the chicken gets browned just a bit. Add the marinade, and a cup of warm water and bring the chicken to a simmer before turning down the gas to low. Cover and cook the chicken for 12 – 15 minutes before adding the pre-boiled dals, the chillies and a teaspoon of salt. Top with another 1/2 to 3/4 cup of warm water, cover and cook for at least 20 minutes (If you want your curry thinner you may want to increase the quantity of water to a cup or so).

Now add the balance garam masala, 2 teaspoons chopped coriander, a rounded heaped teaspoon of ghee or clarified butter (you can omit this if you like, but it makes the dish taste so much better), a squeeze of lime juice and a pinch of dry mango powder (optional).

Allow the dal chicken to rest for at least one hour if not more before you re-heat and serve, this allows all the flavours to come together.

Serve the Dal Chicken garnished with potato straws or plantain chips on a bed of white rice alongside a light refreshing salad.

Oh…don’t wait for me… Go right ahead and dig in!

Potato and Cauliflower aka Aloo Gobi Parathas

I’m constantly griping about my weight and I don’t agree that it’s a woman thing.. to gripe about weight, that is. It’s a ‘Me’ thing.

So I love all kinds of fried food, potato chips and crisps included (especially the kind with extra salt and vinegar) and butter, though I have cut down on the last named item a bit.

Oh the sacrifices ones taste-buds have to make in the name of healthy eating! 😉

I’m waiting for the weather to turn, and the rains to start and I’ll put on my walking shoes and start my 3km walks which will build up to 5kms and more and be happy. My bad knees don’t quite let me run, not on concrete or tarred roads anyway, and the walking track laid out in the park near my house is full of the ambling sort swapping daughter-in-law stories or tales about the stock market. Little has changed in the world… and then there’s the tattooed, bright blue streaked haired waif who breezes past in a brisk clippity-clop kind of walk, like she’s practising for the 50km at the London Olympic Games. And the heavy-set ma’s-in-law stop as do the paunchy men… everyone looks on, in envy… almost.

But back to food and I’ve decided to go Indian today and dish up some parathas (or stuffed Indian fried flat-bread). Parathas are of course right up there with my favourite things, but I don’t make them very often. I could bake them of course… but then, I like them the way they’re meant to be eaten, with a liberal dose of pure ghee (clarified butter) and with some yoghurt (or dahi as we call it) and some pickle (achar) on the side. I also love experimenting with different kinds of fillings in the parathas; potato (aloo), radish (mooli), pea (mutter), cauliflower (phool-gobi), paneer (cottage cheese) and even minced chicken or beef. This time I combined two of my favourites, potatoes and cauliflower or Aloo Gobi, combined them with onions, chillies, garlic and a bunch of spices, then roasted them on the tava or griddle pan before frying them in ghee.

Here’s what you need to make these parathas –

For the dough –

2 1/2 cups Whole wheat flour (+ extra while kneading and making the parathas)

1 teaspoon salt

2 tablespoons vegetable oil

1/2 cup whipped yoghurt (dahi)

1/2 cup water (at room temperature)

For the filling –

1 1/2 cups grated cauliflower (raw)

1 large potato (boiled and roughly chopped)

1 medium onion – minced (I used a white onion)

5 – 6 cloves of garlic – minced

2 green chillies (chopped)

1 teaspoon salt

8 – 10 curry leaves – chopped

3 tablespoons chopped coriander

1/4 teaspoon turmeric powder

large pinch of chilli powder

1 teaspoon cumin powder

pinch of garam masala

1 teaspoon caraway seeds (shah-jeera)

pinch of dried bishops weed (ajwain) (optional)

2 tablespoons oil

a squeeze of lime juice

And lets not forget the ingredient that brings it all home

The ghee or clarified butter for frying. I generally use about 1/2 tablespoon ghee per paratha but you can reduce the amount if you like, or use a vegetable oil instead (sunflower oil would be ideal).

Start by boiling the potato and roughly chopping it while still hot. Then grate the cauliflower. Keep the potato and grated cauliflower aside while you sauté the onion in vegetable oil into which you’ve added caraway seeds and bishops weed. Add the garlic, curry leaves and chillies and sweat them down before you put in the spices. Fry the spices on low (adding in the salt), till the oil separates and immediately add in the cauliflower. Allow it to cook for about a minute before adding the potatoes. Mash the potato up a bit and finish with the chopped fresh coriander and a squeeze of lime juice.

Take the veggie filling off the heat and leave it aside to cool while you get started on the dough.

To make the dough I’ve used yoghurt, vegetable oil, salt all mixed together, along with some water and the flour. Make a well in the centre of the flour, add the yoghurt and oil mix, and fold the flour into the yoghurt, adding a little water at a time until a dough forms. Knead the dough for about 10 – 12 minutes until soft and pliable. Cover the dough with a damp tea-towel and keep it aside for about 30 minutes.

Once the dough has rested, give it a quick knead and divide it into equal sized balls. I didn’t want a very thick paratha, preferring to keep the casing for the filling thin and crisp rather than thick, and I managed to get 11 parathas out the dough. And guess what… the filling too was just perfect for the parathas, not a teaspoon more.

Roll the dough ball in your hands and pat it down. You can either use a rolling pin to roll it out just a bit (about 3″ in diameter) or flatten out the dough ball using your fingers to create a little receptacle for the filling. Place the filling into the dough and pinch it shut, folding over to seal the opening shut. Flatten the filled dough-ball, dip it in flour to coat it well and roll it out with the rolling pin to the thickness you desire… I wouldn’t recommend exceeding 3 – 4mm. Heat the griddle pan till hot, then turn down the heat and place the paratha on the pan, roasting it on one side and then the other for about 2 minutes per side or till you begin to see light brown marks appearing on the parathas. You’ll need to do this a couple of times each side, turning then over to ensure that the parathas get evenly roasted.

Add the ghee, smearing it around, first on one side, then flip the paratha over and smear the ghee on the other side, raise the heat up a notch. Press the paratha down with the back of the spatula, and fry the parathas till they take on a lovely golden hue.

Serve the parathas piping hot with some plain yoghurt…

Spice on the Go… Quick n Easy Pickled Prawns

I recently got a earful from a friend. Actually it was both ears full and all the space between ’em.

“If you aren’t going to send anything my way, how about posting something spicy and super-quick” she grumbled in mock irritation. I’ve known her too long for her to be mad at me over the phone 😉

“Something I can whip up even when I’m deadbeat” she said at the end of her little tirade on how selfish I was. She was looking for an add-on to her meal she told me, something in the nature of a condiment that would lift up the meal she had delivered to her house on week-nights. Packed in an insulated and compartmentalized ‘tiffin’ box, her dinner usually comprised a dal (Indian dish of lentils), rice, rotis (flat bread) and a vegetable or two, which she ate more out of compulsion than desire. Coming home from a work day that never seemed to end, negotiating traffic and crowded trains to get back to what she called a “mundane meal” she ate with distaste. Having take-out at lunch everyday was bad enough, and her stomach often rebelled.

So I was on the spot and I had to redeem myself. I know what it’s like to work the 9 am to 11 pm routine, coming home exhausted and irritated, peering into the fridge to see if there was anything in there which would perk me up, only to find bottles of sauces and cartons of juice. The weekends would come and go in a blur, and when I wasn’t trying to get out of the city for a breather, I had a zillion different chores that needed doing. Shopping for food though part of my ‘To Do’ list often got shelved.

I thought I should do something for her which would keep. Something which would be enjoyed over many, many meals. And then my fisherman got a batch of prawns in one morning, and I leapt up and reached for the curry paste.

I had ordered large prawns from the fisherman for another dish I had in mind but his idea of large didn’t quite meet mine. Or perhaps these prawns were destined for piquancy. More medium sized, some bordering on small, I immediately knew they were going to be pickled. A recipe that was quick and easy to fix… spice on the go. Bottled, this pickle keeps well if kept in a cool and dry place. You can even store it in the refrigerator.

So here it is. No soaking of red chillies in vinegar, none of the de-seeding and grinding that pickles usually involve. Quick n Easy Pickled Prawns.

We Indians love our pickles and chutneys, from the sweet mango murabbas, to the mild water-pickled raw baby mangoes I ate with bowls of steaming congee whenever I visited my grandmother in Goa… to the fiery hot pickles made with ground red or green chillies, with mustard seeds and other spices, cooked in copious quantities of oil, not a drop of water daring to find its way to contaminate the spicy treat in any way.

Summertime was pickling time, back at my grandmother’s place. Rows of sliced mangoes, carrots, aubergines, cauliflower, and different kinds of salted fish drying out in the sun. There were meats too… dried and cured, and mixed with a mélange of spices, then cooked, cooled and bottled. The weather was gentler in those days and the longer the pickle sat, the better it tasted.

This pickle is a simple one, made with a purpose. All it took was a couple of spoonfuls of curry paste, some spices, oil, and the prawns which was my key ingredient. I made the pickle a month and a half ago and left it sitting, all bottled up, waiting for its flavours to develop. You can of course eat it immediately as well, since the vinegar I used was well-cured home-made vinegar. But it does taste way better when it’s left to its own devices for a while. 

Here are the ingredients –

1 kg medium sized prawns (shelled, de-veined, washed, drained and then patted dry)

5 heaped tablespoons curry paste (I used a paste that said ‘hot n spicy’ ;-))

1/4 to 1/3 cup palm vinegar (I used more but it really depends on whether you like the flavour)

2 tablespoons of granulated demerara sugar

1 level tablespoon salt

4 cups sesame seed oil (1 ½ cup to fry the prawns and 2 ½ cups to cook the curry paste and prawns) … many people prefer to use mustard oil but I love the nuttiness of the sesame oil which adds a surprise element to this pickle

1 tablespoon yellow mustard seeds

1 tablespoon minced garlic (almost to a paste – 4 large cloves should do)

A sprig of curry leaves

 Method –

Fry the prawns on high for 1 to 1 1/2 minute. Drain them well and reserve.

Meanwhile heat the second batch of oil, put in a sprig of curry leaves and flash fry, remove the leaves and discard them. Turn the flame down to low before adding the mustard seeds, toss them in the oil and immediately add the curry paste. Cook on low for about 20 – 25 minutes till the oil separates and the curry paste is well cooked.

Now add in the prawns, raise the heat up a notch and cook them, for roughly 2 – 3 minutes, stirring occasionally. Add the vinegar, salt and sugar and cook for about 4 – 5 minutes. Turn of the heat and leave the curried prawns to cool. Do not cover the dish with a lid as you don’t want any water caused by the rising steam to fall into the pickle.

Once the curried prawns have cooled completely, transfer them into clean, sterilised glass bottles, making sure that there is at least 1 cm of oil floating on top of the curried prawns. Cover the top of the bottle with a piece of muslin or a double piece of cling wrap and keep the bottle/s in a cool and dry place for at least a month before eating.

These pickled prawns are best enjoyed as an accompaniment to a simple meal of rice and dal.

I sent some over to my friend, along with the recipe and she ate it with buttered bread :-). I suppose anything goes when you’re hungry. 

From the Old Country… Green Chicken ‘Pitiya’ Curry

This is one of those timeless recipes from my home state of Goa in India. A lesser known one, I’ve only eaten this curry in the part of Goa from where my family originates. It’s not one of the more popular restaurant kind of dishes that have gained in popularity because of their fiery colour or temper, but a rather delicately flavoured one, and one that is prepared without the addition of coconut in any form. So no coconut, no vinegar and no fiery red chillies.

But what this curry does, is remind me of home, of my grandparents on my mother’s side, and of good home food. It’s one of those dishes from the old country with its Indo-Portuguese influence, a curry that comforts, which is what food should do, and this beautiful Green Chicken ‘Pitiya’ Curry does just that.

A beautiful place on India’s western coastline, Goa is a beach paradise, though tourism, rampant corruption and erosion of natural resources have denuded what could have been and once was ‘heaven on earth’. The place holds a lot of happy memories for me, memories that centre around food, and good times… beaches, clear skies and piglets with curly tails running around and grunting in the pig-pen. I tried not to make friends with them. After all it can be pretty heartbreaking when one of your friends lands up on the dining table, feet up, all deep gold and glistening, even if they do taste darn good.

This is basically a recipe that I tweaked from my mother’s repertoire. Known in local parlance as a ‘Pitiya Curry’, this is traditionally made with chicken, and is a green curry with poppy seeds and coriander, with a bunch of other aromatics.

I used about 300gms of boneless chicken for this recipe, though it does taste a lot better if you use chicken on the bone.

The original recipe calls for one small onion, 4 medium sized cloves of garlic and a 1/2″ piece of ginger, but I had just come home after a couple of days of travelling and like Old Mother Hubbard the cupboard was quite bare. I was craving a good home cooked meal and didn’t quite feel like calling in for take out, so I substituted the fresh ingredients for packaged ones and the end result was quite delicious.

Here are the ingredients –

300gms chicken (boneless or on the bone)

juice of 1 small lime

3 tablespoons vegetable oil

1 1/2 tablespoons fried onions (I used a packaged variety)

1/2 teaspoon poppy seeds

4 pods green cardamom

8 peppercorns

3 cloves

1/4 teaspoon cinnamon powder (or a 1/2″ piece of cinnamon… try and get hold of Sri Lankan cinnamon. I believe it’s the best)

1/2 teaspoon cumin seeds

1/2 teaspoon turmeric powder

2 green chillies (de-seed if you don’t want it too hot)

1 teaspoon each of ginger and garlic paste

a small handful of fresh coriander

8 curry leaves

1 medium potato, peeled, chopped into quarters or more and partially shallow fried to golden brown in 2 – 3 tablespoons vegetable oil

1/2 teaspoon salt

3 1/2 – 4 cups of light chicken stock or warm water

4 – 5 tablespoons water (at room temperature)

There are a couple of steps to this recipe the first of which entails marinading the chicken in the lime juice.

Grind all the dry spices, add in the coriander, chillies, ginger-garlic paste, fried onions and about 4 – 5 tablespoons of room temperature water.

Meanwhile lightly fry your cut potatoes in hot oil, enough to brown them, without cooking them completely or burning them. Remove them from the heat and reserve for later use.

Heat about 2 tablespoons of the oil in a pan, adding the curry leaves and the chicken, about 30 seconds later so that the curry leaves release their flavour but don’t burn. Lightly fry the chicken in the oil for a couple of minutes on each side till they get a faint golden tinge. Remove the chicken pieces from the pan, and add in another tablespoon of oil, before adding in the masala that you ground earlier. Fry the masala on medium heat for about 3 minutes or so until the oil separates.

Add the chicken back into the pan, and fry it with the masala before adding the potatoes and salt. Top with warm chicken stock (or water), stir, cover and cook for about 25 minutes on a low to medium flame until the chicken is tender.

This curry is best eaten with a local Goan bread like Poee or Pao (Pav), or  even with a crusty Brun Pao or you can enjoy it over steaming hot white rice, accompanied with some sliced red onions, red radish and chillies pickled in the local goan vinegar and a rice Papad (Papadum) or two.

Sunshine…Versatile… and a Plateful of Pakoras

I love deep-fried food. My weighing scale hates me for it, and as for my hips, I… (No, I won’t say it, coz then they’ll hang around like those uninvited relatives who come to visit bag-n-baggage in tow sans any return ticket), I’ve only just learned to adapt to their constant morphing instead of driving myself crazy when my body decides to get into the stockpiling business and add on the kilos.

Oh there were times I would weep and gnash my teeth and rend my clothes when the needle on the scale went south, but given that most of those clothes were in pretty good wear, I just decided to give them away instead of hoarding them in the hope that I would get back into them. I even have a dress I wore when I was a year old.

I still have this dress. And it’s in way better shape than this photo 🙂

I eventually gave up on the teeth gnashing when the enamel on my teeth started wearing off and I saw my dentist at the Porche showroom when it opened for advance bookings.

I dislike most dentists by-the-way. I kicked one in the jaw when he tried to gas me to knock off a tooth when I was four, and I’m still getting over the fact that the one next door to my parents’ house knocked out a few of my perfectly good molars to put in braces I didn’t need when I was twelve. He charged my parents a pretty packet and when the braces came off, my teeth decided to do their own thing and went right back to where they were. I had to endure a second round of orthodontic appliances attached to my teeth as an adult to fix the problem caused by the first set.

And now on to the fun part…

In early March I received a pleasant surprise from Donna @ The Sugared Pecan when she nominated me for the Sunshine Award.

Now February was a crazy month for me with house painting and setting up and work and internet woes which continued to plague me through March and into this month as well. Which meant that my internet time was interrupted and short, and I’ve had to juggle between trying to put up a post and follow up on my fellow bloggers. Sadly, I’ve fallen behind on both. I must try and remedy the situation soon… I must! I must!

As per the rules of the Sunshine Award, I should

– Include the award logo in a post or on my blog (Done)

– Answer 10 questions about myself (hmmmm… :-I… okay… rules are rules)

– Nominate 10-12 other bloggers I think merit a mention (I’ll try my best)

– Link the nominees to the post and let them know that they have been nominated (Sure… once I’m done nominating them)

– Link back to the person who nominated me (Doesn’t that go without saying :-))

And later that month, Susan from susartandfood nominated me for my second Versatile Blogger Award.

The rules of which are –

-Thank the person who gave me this award and provide a link to their blog (of course :-))

-Nominate 15 blogs/bloggers that I have recently discovered or that I follow regularly.

-Tell the person who nominated me 7 things about myself (hmmm…???)

-Include this set of rules.

-Inform the nominees by posting a comment on each of their blogs.

Let me start off by linking back and thanking Donna who has a delightful blog @ The Sugared Pecan and comes across as a wonderful person, warm and effusive and always a pleasure to read, with interesting recipes and lovely anecdotes that accompany them.

And…

Thank Susan at susartandfood who as an artist, graphic illustrator, cook and writer seems to have a life that’s full of creativity and her cat 😉 among other things.

Here’s the next … the 10 questions (for the Sunshine Award)

My Favourite Colour – Sunshine Yellow

My Favourite Animal – Dogs (though I’d love to say Meerkat)

My Favourite Number – 1

My Favourite Non-Alcoholic Drink (why???) – Cranberry Juice

Prefer Facebook or Twitter – I don’t have a preference here. They both have their uses.

My Passion – Baking and Making my little Clay Men (though I haven’t had the time to do that in a while)

Prefer Getting or Giving Presents – Both… definitely

My Favourite Pattern – Really?… Footprints on wet sand

My Favourite Day of the Week – Saturday

My Favourite Flower – Narcissus

Now to the Seven things about Myself (as required by the Versatile Blogger Award)

I’ll be lazy here and just link back to the last one, since I they haven’t really changed.

And now on to the Nominations and to linking up to them

This is going to be a bit of a toughie since there are so many fantastic bloggers out there, but here goes, and as a Easter treat I’ll be clubbing them together which means all those mentioned here get a 2-in-1 Easter treat with both the Sunshine and the Versatile Blogger Awards coming their way.

And the awards go to –

1. http://subhorup.blogspot.in/

2. http://zestybeandog.wordpress.com/

3. http://anunrefinedvegan.com/

4. http://delicio8.wordpress.com/

5. http://curryandcomfort.blogspot.in/

6. http://kofegeek.wordpress.com/

7. http://confederacyofspinsters.com/

8. http://authenticfooddelights.blogspot.in/

9. http://myyatradiary.blogspot.in/ 

10. http://365daysofbaking.blogspot.in/

Nominating your fellow bloggers for awards is such hard work because they are all so unique in terms of content, style and versatility, it’s really difficult to pick one over the other. So do go and check out these blogs. They are all incredible.

And now on to the treat after the awards are handed out and what better than a tasty snack that goes as well with a cup of chai, as it does with a cold beer.

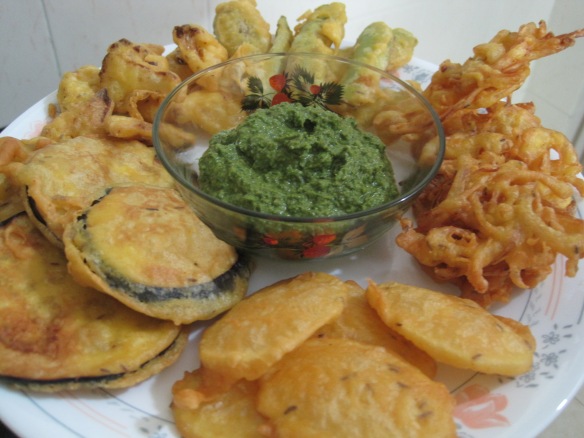
Fritters are really quite popular around the world and here in India we’re no different. And because we’re such a vast country with so many different regions all different from each other in terms of language, culture and cuisine, every part of India throws up its own variation of some of the more popular foods on offer. The one dish that really bridges the gap between most cultures however is the Pakora. Known as Bhajjias [pronounced bha-gee(as in gee wiz)-yaas] in and around Mumbai where I live, this crunchy snack is a popular street food served piping hot straight off the deep fryer, and accompanied by both dry and wet chutneys.

The pakora or bhajjia can also take different forms and can be made from different vegetables or lentils, or combinations of the same. I prefer to make mine more in a tempura style, with cut slices or strips of assorted vegetables. Paired with a chutney or a spicy tomato or tamarind sauce they are the perfect any-time comfort food, especially when the weather turns cold or wet.

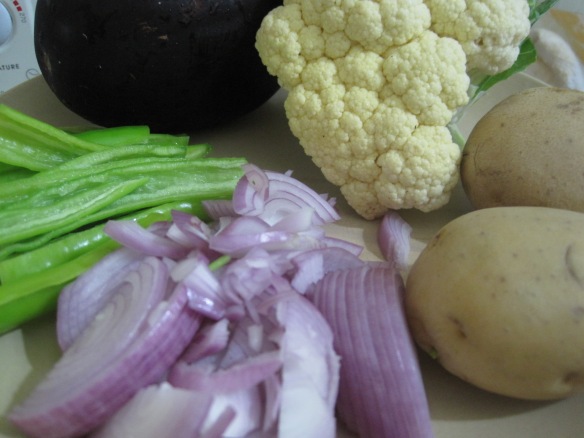
I used an assortment of veggies – Potatoes, Aubergines, Fat Green Chillies, Onions and Cauliflower.

Usually dipped in a batter made of chickpea flour, I used a combination of chickpea and rice flour (1:1/4 cup) to give them that extra crunch. And an assortment of spices, caraway seeds (1/2 teaspoon), cumin powder (1/2 teaspoon), red chilli powder (1/4 teaspoon), a pinch of turmeric powder, minced garlic (I crushed and minced @ large cloves to a paste like consistency), salt to taste, and a pinch of baking powder. Use about 1/3 cup of ice-cold water and a few ice cubes to make the batter.

Heat a large wok or deep-fryer with oil. I’ve never used a thermometer to test the temperature of the oil relying more on instinct, but you could drop a tiny blob of batter into the oil to test its readiness. If it rises up instantly and crisps up within seconds your oil is ready. Dip the sliced/cut veggies into the batter before lowering them into the oil. Do not overcrowd the wok/fryer, this will ensure that all the bhajjias/pakoras all cook evenly and crisp up nicely without getting soggy in the middle.

Drain them on a paper towel and sprinkle some extra cumin, salt and add a squeeze of lime or a drop of vinegar, and serve them with spicy chutney.

The chutney I made here is similar to the one I made for the Corn, Ricotta and Fenugreek Samosas, only this time I used very little peanuts and a lot more mint and coriander for that lighter more minty taste.

I’ll walk an extra hour tomorrow.

Roast Chicken in a Spicy Yoghurt Marinade

When you think of serving up a spicy Indian chicken the first thing that comes to mind is tandoori chicken. But most places serving tandoori chicken apart from the spices they use, tend to incorporate some sort of food colouring that leaves your fingers tinted a strange reddish-pink even as you tear off a nice chunk. In my opinion Indian spices really don’t need additives. Varied in terms of levels of heat, taste, texture and colour, Indian spices can well do without food colouring to make any dish using them look appetising.

Besides what do you do if you don’t have a tandoor? I don’t have one, and I suppose neither do many people living in apartment buildings. In fact even an open barbecue or wood-fired grill is a no-no for most city dwellers, and we can’t always call in for take out.

So here’s a simple oven-roasted chicken with Indian spices. Marinaded in lime juice, yoghurt, fresh roasted and powdered cumin and coriander seeds, kashmiri chilli powder, a coarse ground regular hot red chilli powder (you could substitute with sweet and hot paprika), ginger and garlic powder, a pinch of nutmeg and clove powder, turmeric powder, salt to taste, chopped fresh mint and a touch of olive oil instead of butter (since I’m watching my weight), this is an on-the-go, quick marinade which can be whipped up in no time. You don’t even need to roast an entire chicken like I did. Thaw your piece/s of chicken overnight, then whip up the marinade in 10 minutes tops, lightly salt the chicken and add a 1/2 teaspoon of lime, let it sit for 10 minutes, pat it dry, coat the chicken with the marinade, cover it with cling film and stick it back into the fridge (not the freezer).

When you get back from work, get the chicken out of the fridge and let it come to room temperature while the oven pre-heats, and either bake it covered in foil or roast it open in the oven. You can even marinade boneless cubes of chicken, skewer them onto metal skewers with an assortment of bell-peppers, onions and tomatoes and roast them in the oven or on the barbecue till done.

Roasting chicken always makes me think of family and sitting down at the table with so much food we’d be spoiled for choice. My parents weren’t the indulgent sorts though. Rather strict in the way they raised us, we had to say grace and sit at table while we ate (none of that TV dinner stuff), making wholesome conversation, and finishing off what was on our plates, taking it in turn to clear, unless of course you were a habitual malingerer, which meant you had perennial table-clearing privileges until you saw the folly of your ways and made amends. Raised in god-fearing Catholic homes my parents brought us up by the book, with the occasional paddle and cane, but they made sure we were well fed and well schooled, not just academically but in the niceties of life. ‘The well-brought-up versus the dragged-up’ as my mum would say, referring to some of the more free spirited kids who lived down the road, who roamed around with slippered feet and crumpled clothes. She made sure despite raising three of us almost single-handedly (my dad was in the merchant navy) that our clothes were ironed to military crispness and our ears were washed, that our homework was done on time and that we brought home a good report card or we would have hell to pay. She also made sure we ate a balanced diet which most definitely included a selection of veggies at every meal and different meats and fish. But what I really looked forward to was the roast chicken she made. In-charge of the stuffing, I had to do it in the order she laid down, no different, chopping to exact proportions and in a sequence she had mastered. Rather difficult for a rebellious Scorpio child who was itching to break-free and do her own thing. The marinade too was one she had perfected, honey glazed with a few additions that made it her own. But the stuffing was something else, packed with cubes of fried bread and potatoes with fried chicken livers, crispy bacon bits, green peas, carrots, raisins and an assortment of nuts, then liberally laced with whiskey. It took the stuffing to as close to culinary heaven as you could get.

But I’m not venturing down that road. That one’s reserved for Christmas at my parent’s home and the stuffed turkey or chicken which is the mainstay of the meal.

So this is my simple Indian style roast chicken, marinaded with yoghurt and a host of spices.

Encase the chicken in foil and slow roast it for 45 minutes to an hour at 250 degrees C until the chicken is tender, Then unwrap the chicken from the foil and drain out the marinade, adding it to any reserve marinade and roast the chicken uncovered on a wire rack placed over the baking tray, until crisp on the outside for another 30 – 40 minutes, taking care to turn it around occasionally. Keep basting the chicken from time to time with the reserve marinade and juices. This will ensure that the chicken stays moist even as the skin crisps up.

Meanwhile heat up the reserve marinade and juices from the chicken and add a couple of tablespoons of honey… well more than a couple (4 – 5 more like it).

Serve the chicken garnished with lime, onion rings, slices of tomato and sprigs of fresh mint leaves.

Spoon some of that reduced sauce over the chicken and pour yourself a glass of Merlot or Shiraz, my wines of choice with this dish.

Have yourself a fabulous weekend.

Murg Badami… aka Almond Chicken

The thing about food and cooking is that it goes hand in hand with a love for feeding people, and watching them enjoy what you cook. In my case, it’s also one of those gifts that came down to me from my grandparents. My love of food, cooking and of course making sure that whoever drops by, gets fed.

My grandfather on my dad’s side… (I never met him. I’m a Scorpio, and if you’ve read Linda Goodman, you’ll know what she says about Scorpio births… and she was right, because within a month of mine, my grandfather passed away). So yeah, my granddad was the kind of person who always set an extra place at the dining table whenever the family sat down to eat, just in case someone dropped in unannounced. My mum’s mother was like that as well, and she was a phenomenal cook, a magician in the kitchen who could conjure up the most tasty dishes out of thin air. And it didn’t really matter what was in her pantry. You dropped by and you didn’t leave without a meal… and a darn good one at that.

Murg Badami or Almond Chicken is a fairly popular Indian dish, but this is my version, and it’s low-fat. I came up with the recipe when I had a friend over to dinner and wanted to cook something festive, but not too rich or laden with ghee (clarified butter) and cream. So even though this dish may look heavy, it isn’t. There are quite a few steps involved in its preparation though, but you’ll see that it’s well worth every bite.

I used about 400gms of boneless chicken pieces and a melange of powdered spices for the marinade that went onto them.

1/2 teaspoon – turmeric powder & garam masala

1 teaspoon each – cumin & coriander powder

1 teaspoon – tandoori masala

1/2 teaspoon – salt

1 teaspoon – ginger garlic paste

4 tablespoons – yoghurt

juice of 1 lime

Coat the chicken with the marinade and allow it to sit for a minimum of 4 hours (or overnight) in the refrigerator.

Add a tablespoon of oil to the chicken (more if required), then skewer and roast in the oven at 200 to 210 degrees C, turning it periodically and brushing it with some of the marinade and oil (you can use a grill pan or a barbecue top if you like) till the chicken is just done and has a light singe/char. Cover the pieces in foil when done and allow them to rest.

For the almond gravy, the ‘badami’ part of our Murg Badami, you’ll need:

2 – 3 dried red/Kashmiri chillies, de-seeded and  soaked in warm water.

15 almonds – blanched, peeled and ground with the red chillies and 2 teaspoons water to make a paste. You could use more if you want a thicker gravy, but I wanted it light so I stuck with 15 almonds.

Heat a pan with a tablespoon of vegetable oil and sauté 1/2 a red onion that has been sliced fine, till it turns golden brown. Add about 2 cups of chicken stock, the reserve marinade from the chicken, and another tablespoon of whipped curd. Cook the sauce down on low heat for about 15 – 20 minutes or till reduced in half. Add in the chicken kebabs/grilled chicken, 2 slit green chillies (de-seeded if you don’t want it too hot), a 1/2″ piece of ginger julienned, a teaspoonful of dark brown sugar and simmer for 5 – 7 minutes on a low flame.

To finish add the almond-chilli paste and mix well. Let it simmer for a couple of minutes.

Garnish with a sprinkling of fried onions, a tablespoonful each of fried raisins and toasted almonds and a tablespoon or two of chopped fresh coriander.

I served the ‘Murg Badami’ with a buttery pea and paneer (cottage cheese) basmati rice, flavoured with ground cumin.

Salmon in Coconut Milk Curry

Indian Salmon known locally as Rawas is a delicious fish and one of my personal favourites. As with most fish the cooking time on this recipe is very short, which makes it an easy to whip up curry, even at short notice.

The recipe calls for easily available ingredients, which you may in all probability have in your pantry, and the end result is a simple, light curry. All you may have to do is probably trot down to the market for fish. That is in case your fishmonger doesn’t deliver to your doorstep.

I’ve used 6 medium size salmon steaks – which makes about 3 average size servings, marinading the steaks in the juice of 1/2  a large lime, with a 1/2 teaspoon of salt, and a 1/2 teaspoon each of turmeric powder, paprika and yellow mustard seeds (you can use English Mustard if you like – but half the quantity of the seeds).

Coating the fish with the spices and letting the flavours absorb into the fish, before frying the steaks for about a minute and a half on each side in hot oil, to give it a nice sear. Please do not over-fry the fish… because the purpose is merely to impart a lovely golden colour to the fish without overcooking it.

Drain the fish on paper towels to remove any excess oil and set aside.

For the curry, I used half a medium red onion – sliced, one medium tomato, chopped fine and two green chillies (with the seeds), along with 2 cloves of garlic and a half inch piece of ginger, sliced fine.

Heat about a tablespoon of vegetable oil in a heavy bottomed pan. I used sunflower oil, but you can use any other neutral flavoured oil. [The heavy bottomed pan allows even distribution of heat, which in turn lets the the fish cook evenly, and prevents the coconut milk from burning or curdling.] Sauté the onion along with ginger and garlic, till it takes on a light golden hue, drop in the curry leaves and give it a quick stir before adding in the chopped tomatoes and a teaspoon of salt. Cover and cook for a couple of minutes on a very low flame.

In a mortar blend 1 teaspoon of yellow mustard seeds, a teaspoonful of cumin powder, a pinch of turmeric and kashmiri chilli powder with 1 – 2 teaspoons of oil. Add the spicy blend to the tomatoes and cook for 10 minutes, before adding in a 1/4 cup of water, simmer for an additional 10 minutes and then bring up to a boil. Add 3/4 cup of thin coconut milk at this point and reduce back to a simmer, lowering the fish steaks into the coconut curry. Add the green chillies and cook for 5 – 7 minutes.

Finish with a quarter cup of coconut cream and 2 tablespoons chopped coriander.

A few slices of raw mango would make an excellent addition to the curry, but I didn’t have any… and it really didn’t seem to matter in the end.

I served the curry with white rice and crisp aubergine (eggplant/brinjal) fritters.

K is for Kofta… Chicken Kofta

So in the ‘A to Z of Cooking from the Heart’, I’ve jumped from ‘C’ to ‘K’… But we’re finally into a new year and the calendar says 2012 in giant letters. Which means that if the Mayans got it right, we may be eating our last couple of meals before the lights go out, and we’re headed to who knows where.

Oops!

Now, I’m really sorry if my dark sense of humour put the frights into you, but it’s something that slips out of me quite inadvertently, even though I try to rein it in.

Honestly… I do.

But speaking of heading out on journeys, I’m not one of those who can travel on a full stomach. For one, I’m prone to motion sickness, so I always eat light before I hit the road. And then I’m not one of those people who’d be into huge or heavy last meals, given a choice. I’d much rather have something light, but tasty. And most definitely something that reminds me of home…

Some ‘koftas’ perhaps?

Now to the uninitiated… ‘koftas’ are nothing but spicy meatballs. And because I wanted to keep it light I decided to use chicken. Cooking those juicy  morsels in a chunky but light tomato gravy flavoured with whole spices, and a hint of a few ground spices.

Unlike a lot of Indians however, I’m not too partial to heavy masala based gravies, unless the recipe absolutely calls for it, but I tend to favour green chillies. This recipe uses 3 hot (spicy) green chillies, and I kept the seeds in. But you are free to use less and remove the seeds too if you cannot handle the heat.

For the koftas I used –

1 1/2 cups of lean minced chicken

1/2 medium sized red onion, chopped fine

3 tablespoons fresh chopped coriander

2 large cloves of garlic (minced)

1/2″ piece of ginger (minced)

3 green chillies chopped (but of course!)

1 egg

Mixing it all together with –

1/3 cup fresh breadcrumbs

1 teaspoon salt

1/2 teaspoon crushed black pepper

2 teaspoons freshly roasted and pounded cumin

1/2 teaspoon red chilli powder

1/2 teaspoon of garam masala…

Forming the mixture into the koftas, and refrigerating them for about an hour for the flavours to come together. This also helps the koftas hold their shape when you lower them into the simmering gravy.

For the gravy –

3 large ripe tomatoes, blanched and chopped

1 small red onion, minced

2 tablespoons vegetable oil

3/4 cup chicken stock

4 whole green cardamoms

1 – 2 ” stick of cinnamon

4 cloves 

5 – 7 peppercorns coarsely crushed

1/2 teaspoon salt (or to taste)

1 green chilli (with or without seeds)

… Sauté the onion in the oil till translucent and add the whole spices, frying them on a low flame for a couple of minutes, before adding the tomatoes and the salt. Break down the tomatoes a bit with the back of the ladle. Then cover and cook for 15 minutes, adding the warm chicken stock, and letting the gravy (sauce) come to a boil.

Reduce the flame and add in the koftas, one at a time, dropping them gently into the gravy. It’s important not to stir the koftas or move them around at this stage to prevent them from breaking up.

Cover and cook for 20 minutes or till the gravy has reduced to half or less

These koftas are light, delicate and full of the natural flavours of the spices and the other aromatics that went into them…. You can serve them with some crusty bread, or with some rice.

I served them with a pea and cumin basmati pilaf.

Akuri or Spicy Scrambled Eggs with Ginger

I’m a Mumbai girl and way back in the day when I worked a 9 to 5 or rather a 9 to 9 job the only time I got to unwind was on those weekend trips I’d take with a few of my pals from work. We would generally head off to Matheran or Lonavla or sometimes when the adventure bug bit us hard enough, we’d head out to some other off the beaten track sort of place.

Longer weekends however usually meant Panchgani, and those trips are etched in my memory in inedible ink… not just for the numerous times we had to stop en-route because I was bus-sick but for all the wonderfully happy memories they hold. Like the time we ate so many mulberries our teeth and tongues were purple for days,or the time we sat drinking rum under that tree on Tableland in the heat of the blazing afternoon sun. We were nuts! And sloshed!

Panchgani also meant Jerroz Hotel. A quaint cottage up the street from the more famous Il Palazzo hotel, Jerroz was run by an old Parsi couple as a B-n-B. Nothing fancy, just your basic amenities, but it was clean and homely and the old woman was a darling, serving up some of the best Akuri on the planet… and I’ve eaten quite a few.

Now what can I say about eggs that hasn’t been said already, except that I love them… boiled, poached, scrambled, fried sunny-side-up… and especially as Akuri, which to the uninitiated can be translated as – a spicy melange of eggs scrambled with onions, tomatoes and corriander. What puts Akuri into a different zone is the hint of ginger, the dash of black pepper and loads of green chillies.

This is my version of that wonderful dish…

I’ve used spring onions (scallions) instead of the regular red onions and since I made it for brunch (Oh! Yes! Did I forget to mention that I can eat eggs at breakfast, lunch and dinner…. and as a midnight snack, sunny-side-up on hot buttered toast?) I baked parathas to go along with it.

Here’s to Akuri, to Jerroz Hotel, to good friends and to happy memories.